
Peanut Butter and Jelly Cookies Recipe
Introduction
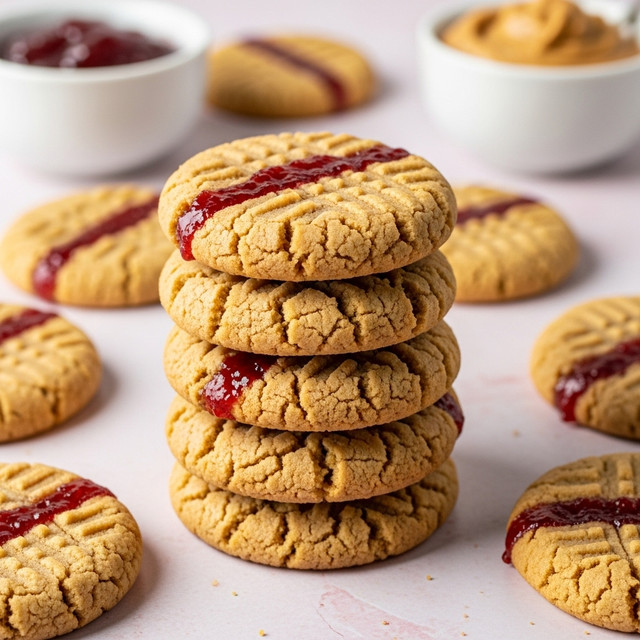
Peanut Butter and Jelly Cookies are a nostalgic twist on the classic sandwich, combining rich peanut butter with a sweet strawberry jam center. These soft, flavorful cookies are perfect for satisfying your sweet tooth with a touch of childhood comfort.

Ingredients
- 1 stick (113 grams) unsalted butter
- 1 cup (270 grams) creamy natural peanut butter, very well stirred
- 1 cup (200 grams) packed light brown sugar
- 3/4 cup (150 grams) granulated sugar
- 2 ¾ cups (349 grams) bleached all-purpose flour
- ¾ teaspoon baking soda
- ½ teaspoon baking powder
- ½ teaspoon fine sea salt
- 2 large eggs, at room temperature
- 1 tablespoon milk
- 2 teaspoons vanilla extract
- ¾ cup (240 grams) strawberry jam or jelly, chilled
Instructions
- Step 1: Preheat the oven to 350°F. Line large rimmed baking sheets with parchment paper.
- Step 2: In a large microwave-safe bowl, microwave the butter in 20-second bursts until melted. Add the peanut butter and stir until well combined. Whisk in the brown sugar and granulated sugar, then set aside to cool until just warm.
- Step 3: In a medium bowl, whisk together the flour, baking soda, baking powder, and salt. Set aside.
- Step 4: Add the eggs, milk, and vanilla extract to the butter mixture and whisk thoroughly until combined. Stir in the flour mixture using a sturdy spatula until just combined.
- Step 5: Use a large spring-loaded cookie scoop to form the dough into 3-tablespoon rounds. Roll each between your palms to smooth. Using your thumb, create a well in the center of each dough ball. Add 1 heaping teaspoon of chilled jam and partially seal it with dough, leaving some jam visible. Lightly roll back into a ball and place jam side up on the prepared baking sheet, spacing them about 3 inches apart.
- Step 6: Bake for about 14 minutes, or until the cookies are puffed and lightly browned at the edges.
- Step 7: Let the cookies cool on the baking sheet for 5 minutes before transferring them to a cooling rack to cool completely.
- Step 8: Store the cookies in an airtight container for up to two days. They will become softer the longer they sit.
Tips & Variations
- For a twist, try using different flavors of jam such as raspberry or apricot.
- Using chilled jam helps it hold its shape during baking and prevents excessive spreading.
- If you prefer chunky texture, use chunky peanut butter instead of creamy.
- Chill the dough before scooping if it feels too soft to handle easily.
Storage
Store these peanut butter and jelly cookies in an airtight container at room temperature for up to two days. They keep best when fresh, becoming softer as time passes. To enjoy them warm, gently reheat in the microwave for 10–15 seconds before serving.
How to Serve
Serve this delicious recipe with your favorite sides.
FAQs
Can I use natural peanut butter for this recipe?
Yes, natural peanut butter works well, but make sure it is thoroughly stirred to incorporate the oils evenly for the best dough consistency.
Why does the jam need to be chilled?
Chilling the jam helps it stay firmer inside the cookie while baking, preventing it from melting too much and spreading out on the baking sheet.
Print
Peanut Butter and Jelly Cookies Recipe
- Total Time: 34 minutes
- Yield: 24 cookies 1x
- Diet: Vegetarian
Description
Delight in these soft and chewy Peanut Butter and Jelly Cookies, featuring a creamy peanut butter dough filled with sweet strawberry preserves. This nostalgic treat combines the classic sandwich flavors into a perfect handheld cookie with a slight caramelized edge and a gooey jam center that peeks through for an irresistible appearance and taste.
Ingredients
Wet Ingredients
- 1 stick (113 grams) unsalted butter
- 1 cup (270 grams) creamy natural peanut butter, very well stirred
- 2 large eggs, at room temperature
- 1 tablespoon milk
- 2 teaspoons vanilla extract
Dry Ingredients
- 2 ¾ cups (349 grams) bleached all-purpose flour
- ¾ teaspoon baking soda
- ½ teaspoon baking powder
- ½ teaspoon fine sea salt
Sugars
- 1 cup (200 grams) packed light brown sugar
- ¾ cup (150 grams) granulated sugar
Filling
- ¾ cup (240 grams) strawberry jam or jelly, chilled
Instructions
- Preheat the oven: Set your oven to 350°F (177°C) and line large rimmed baking sheets with parchment paper to prepare for baking.
- Melt butter and combine with peanut butter and sugars: In a large microwave-safe bowl, microwave the butter in 20-second bursts until melted. Stir in the peanut butter until smooth, then whisk in both brown and granulated sugars. Allow the mixture to cool to just warm.
- Mix dry ingredients: In a separate medium bowl, whisk together the flour, baking soda, baking powder, and sea salt to ensure they are evenly distributed.
- Combine wet and dry ingredients: Add eggs, milk, and vanilla extract to the peanut butter mixture and whisk vigorously until smooth. Fold in the dry ingredients with a sturdy spatula until just combined, careful not to overmix.
- Shape the cookies: Using a large spring-loaded cookie scoop, portion out 3-tablespoon rounds of dough. Roll between palms to smooth, then use your thumb to create a well in the center of each. Spoon 1 heaping teaspoon of chilled strawberry jam into the well, sealing partially with dough but leaving some jam visible. Lightly roll back into a ball and place on the baking sheet spaced about 3 inches apart with jam side up.
- Bake the cookies: Bake in the preheated oven for approximately 14 minutes, or until cookies are puffed and lightly browned around the edges.
- Cool the cookies: Let the cookies cool on the baking sheet for 5 minutes to set, then transfer to a cooling rack to cool completely.
- Store appropriately: Store the cooled cookies in an airtight container for up to two days. Note that they will soften the longer they sit, becoming more tender and chewy.
Notes
- Using natural peanut butter ensures a more authentic peanut flavor and proper texture.
- Chilling the jam before using helps it hold its shape inside the cookie during baking.
- Be careful not to overmix the dough once dry ingredients are added to avoid tough cookies.
- If you prefer a firmer cookie, reduce the baking time by 1–2 minutes but watch carefully to avoid underbaking.
- Store cookies in a cool, airtight container to maintain freshness.
- For a gluten-free version, substitute the all-purpose flour with a gluten-free baking flour blend.
- Prep Time: 20 minutes
- Cook Time: 14 minutes
- Category: Dessert
- Method: Baking
- Cuisine: American
Keywords: peanut butter cookies, jelly cookies, peanut butter and jelly, soft cookies, dessert, snack, strawberry jam cookies

