
Christmas Tree Croquembouche Recipe
Introduction
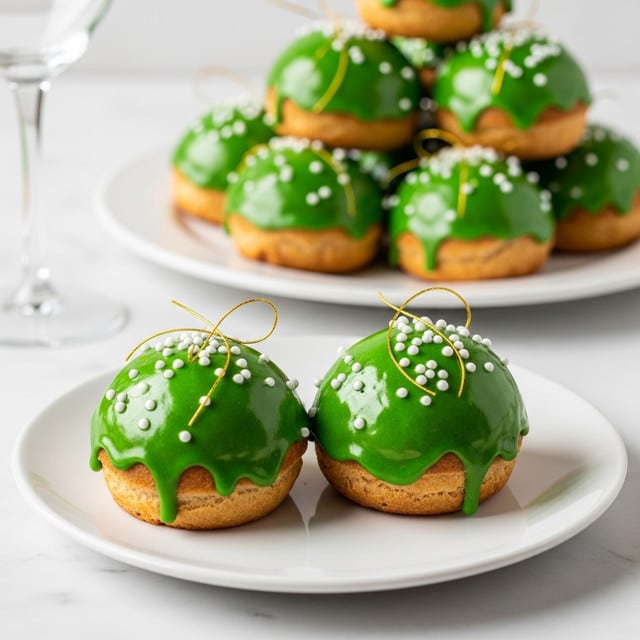
This Christmas Tree Croquembouche is a festive and impressive dessert perfect for holiday celebrations. Crisp cream puffs filled with whipped cream and coated in green icing are stacked into a beautiful edible tree, decorated with caramel strands and a star cookie topper.

Ingredients
- 1 cup whole milk
- 3/4 cup (1 1/2 sticks) unsalted butter
- 2 tablespoons granulated sugar
- 2 cups (240 g) all-purpose flour
- 1 teaspoon kosher salt
- 6 large eggs, beaten to blend
- 2 cups heavy cream
- 2 cups (225 g) confectioners’ sugar
- 3 tablespoons whole milk
- 2 tablespoons corn syrup
- Green food coloring
- Nonpareils, for decorating (optional)
- 1 cup (200 g) granulated sugar
- 1 store-bought star-shaped sugar cookie
- 2 piping bags, a large round tip, a small round tip
Instructions
- Step 1: Preheat the oven to 425°F and arrange racks in the upper and lower thirds. In a medium pot over medium heat, combine milk, butter, granulated sugar, and ½ cup water. Stir frequently until butter melts and mixture starts to simmer, about 3 minutes.
- Step 2: Add flour and salt, cooking and stirring with a wooden spoon until a smooth dough forms and leaves a film on the pot bottom, 2 to 3 minutes.
- Step 3: Transfer dough to a stand mixer fitted with a paddle attachment. Beat on medium speed until cool and no longer warm, about 8 minutes.
- Step 4: With the mixer running, slowly add the beaten eggs. Beat on medium-high until dough is shiny and an indentation remains when touched, slightly sticky. Transfer to a piping bag with a large round tip.
- Step 5: Pipe 1 ½-inch circles spaced 2 inches apart on two parchment-lined baking sheets. Wet your finger lightly to smooth any sharp points.
- Step 6: Bake 10 minutes at 425°F, then reduce heat to 375°F and bake 18–20 minutes more, until golden and hollow sounding when tapped. Let cool completely.
- Step 7: For the whipped cream, beat heavy cream in a chilled bowl with a whisk attachment until stiff peaks form. Refrigerate 20 minutes.
- Step 8: Transfer whipped cream to a piping bag with a small round tip. Poke a small hole in each puff’s bottom and fill with whipped cream. Return to baking sheet.
- Step 9: Mix confectioners’ sugar, milk, and corn syrup until smooth. Add green food coloring until desired shade is reached.
- Step 10: Dip tops of puffs in icing and return to sheet. Sprinkle with nonpareils if using. Let icing harden about 30 minutes.
- Step 11: Shape a piece of poster board or cardstock into a cone about 7 inches wide at the base. Wrap in parchment and tape. Set on a platter.
- Step 12: Heat granulated sugar and 1/4 cup water in a pot over medium-high heat without stirring until light golden caramel forms, about 10 minutes. Remove from heat.
- Step 13: Quickly dip the side of a puff into caramel and attach it caramel-side to the base of the cone, icing side facing upward. Repeat around the base using 11–12 puffs.
- Step 14: Dip puff bottoms into caramel and press them around and upward on the cone, holding for a few seconds until set. Use angled placement and caramel-dipped sides to fill gaps as needed.
- Step 15: Dip the star cookie into caramel and place on top of the cone. Support with additional puffs if necessary.
- Step 16: Dip a fork into warm caramel and quickly twirl around the tree to create fine caramel strands.
- Step 17: To serve, carefully pull puffs off the cone or cut away with a knife and spoon.
Tips & Variations
- Make the unfilled cream puffs up to a day ahead and keep refrigerated to save time on serving day.
- Use different food coloring or sprinkles to customize your tree for other holidays or occasions.
- Work quickly when handling caramel, reheating gently if it begins to set before you finish arranging the puffs.
Storage
Store any leftover cream puffs, filled or unfilled, in an airtight container in the refrigerator for up to 2 days. Reheat caramel decorations carefully if needed, or enjoy the croquembouche fresh. Filled puffs are best served the day they are made for optimal texture.
How to Serve
Serve this delicious recipe with your favorite sides.
FAQs
Can I make the pastry cream ahead of time?
This recipe uses whipped cream filling instead of pastry cream, which is best prepared and filled shortly before assembly for freshness and stability.
How do I keep the caramel from hardening too quickly?
Keep the caramel warm by placing the pot in a bowl of hot water or gently reheating over low heat. Work quickly when assembling and avoid stirring the caramel while heating to ensure a smooth consistency.
Print
Christmas Tree Croquembouche Recipe
- Total Time: 1 hour 20 minutes
- Yield: Approximately 40 cream puffs, enough to assemble one Christmas tree about 12 inches tall 1x
Description
This festive Christmas Tree Croquembouche is a stunning tower of golden, cream-filled choux pastry puffs dipped in green icing and assembled with rich caramel. The delicate pâte à choux puffs are filled with whipped cream, coated in a glossy green icing, and stacked around a cone shape to create an elegant holiday centerpiece. Finished with caramel strands and a star cookie topper, this impressive French-inspired dessert is perfect for holiday celebrations and will wow guests with its beautiful presentation and delightful texture contrast.
Ingredients
Pâte À Choux
- 1 cup whole milk
- 3/4 cup (1 1/2 sticks) unsalted butter
- 2 tablespoons granulated sugar
- 1/2 cup water
- 2 cups (240 g) all-purpose flour
- 1 teaspoon kosher salt
- 6 large eggs, beaten to blend
Whipped Cream & Icing
- 2 cups heavy cream
- 2 cups (225 g) confectioners’ sugar
- 3 tablespoons whole milk
- 2 tablespoons corn syrup
- Green food coloring (1 to 3 drops as needed)
- Nonpareils, for decorating (optional)
Caramel & Assembly
- 1 cup (200 g) granulated sugar
- 1/4 cup water (for caramel)
- 1 store-bought star-shaped sugar cookie
- 2 piping bags, one fitted with a large round tip and one with a small round tip
- Parchment paper
Instructions
- Make Pâte À Choux: Preheat the oven to 425°F and arrange racks in the upper and lower thirds. In a medium pot over medium heat, combine whole milk, unsalted butter, granulated sugar, and 1/2 cup water. Stir frequently until butter melts and mixture begins to simmer, about 3 minutes. Add flour and kosher salt, cooking while stirring until a smooth dough forms and leaves a slight film on the bottom of the pot, 2 to 3 minutes.
- Cool and Beat Dough: Transfer the dough to a stand mixer fitted with the paddle attachment. Beat on medium speed until the dough cools down and is no longer warm, approximately 8 minutes. With the mixer running, slowly add the beaten eggs until the dough is shiny and forms a slight indentation when touched, being slightly sticky but smooth.
- Pipe and Bake Puffs: Pipe 1 1/2 inch wide circles spaced 2 inches apart onto two parchment-lined baking sheets. Wet your finger slightly and smooth out any sharp points. Bake the puffs for 10 minutes at 425°F, then reduce oven temperature to 375°F and bake for an additional 18 to 20 minutes until deeply golden brown and hollow sounding when tapped at the bottom. Cool completely.
- Make and Pipe Whipped Cream: In a clean bowl fitted with a whisk attachment, beat heavy cream until stiff peaks form. Refrigerate for about 20 minutes. Transfer whipped cream into a piping bag with a small round tip. Using a small knife, poke a hole in the bottom of each puff and fill them with whipped cream.
- Prepare Green Icing: In a bowl, combine confectioners’ sugar, whole milk, and corn syrup until smooth. Add 1 to 2 drops of green food coloring and stir until evenly colored. Dip the top of each filled puff into the icing and place back on the baking sheet. Optionally, sprinkle nonpareils on top. Let icing harden for about 30 minutes.
- Form Cone Base: Shape a piece of poster board or cardstock into a large cone with about a 7-inch base opening. Wrap the cone with parchment paper and secure with tape. Place the cone on a serving platter or over parchment paper.
- Make Caramel: In a medium pot over medium-high heat, cook granulated sugar and 1/4 cup water without stirring until the mixture turns light golden, about 10 minutes. Remove from heat immediately to prevent burning.
- Assemble Croquembouche: Working quickly while the caramel is still liquid, dip the sides of the green-iced puffs into the caramel and attach them around the base of the cone, caramel side down with the green icing facing upward. Use 11 to 12 puffs for the base layer. Continue dipping the bottoms of puffs in caramel and layering them closely around and up the cone, holding each puff until the caramel hardens. Rewarm caramel as needed during assembly to keep it malleable. Use the caramel to fill any gaps by dipping sides of puffs as well.
- Top with Cookie and Decorations: Dip the star-shaped sugar cookie into the warm caramel and place it on the top of the cone. Arrange additional puffs around the cookie for support.
- Create Caramel Strands: Dip a fork into warm caramel and quickly twirl it around the assembled tree to create delicate strands of caramel for a decorative, festive effect.
- Serve: To serve, either pull puffs off the cone individually or cut carefully with a knife and spoon to release portions without damaging the presentation.
Notes
- Unfilled cream puffs can be made one day ahead and stored airtight in the refrigerator.
- Icing can be prepared two days ahead; keep plastic wrap pressed on its surface and refrigerate to prevent drying.
- Caramel hardens quickly; rewarm gently over low heat if it thickens during assembly.
- Using a finger slightly wetted to smooth piped dough helps avoid sharp points that can burn or brown unevenly.
- For best results, use fresh eggs and high-quality butter for the choux pastry.
- Be cautious when working with hot caramel to avoid burns.
- Prep Time: 40 minutes
- Cook Time: 40 minutes
- Category: Dessert
- Method: Baking
- Cuisine: French
Keywords: Christmas dessert, French pastry, cream puffs, croquembouche, holiday dessert, festive dessert, choux pastry, caramel dessert, whipped cream filling, Christmas tree dessert


